Sew What, Alicia?

Easy Fabric Projects for all Levels

  • Facebook
  • Instagram
  • Pinterest
  • Twitter
  • Home
  • About Me!
    • Signup!
  • All Things Sewing
  • Quilting
  • Cut Files
  • Christmas Sewing
Home » Quilt Blocks » Sewing School – Triangle Quilt Block
This post may contain affiliate links. I may receive a small commission from your purchase at no extra charge to you. See our full disclosures HERE.

January 26, 2016 by: sewwhatalicia

Sewing School – Triangle Quilt Block

  • Facebook
  • Twitter

Sewing School – Triangle Quilt Block

Sewing School - Triangle Quilt Block | Sewwhatalicia.com

Sewing School – Triangle Quilt Block – 

This is the last Sewing School assignment for January. To get the measurements and supplies for this project see the first four posts here: Post 1, Post 2, Post 3, and Post 4.

Line up your pieces in the order that you want them. Now grab the first two triangles. You can start at the top or the bottom the left or the right just keep them in order as you sew them together.

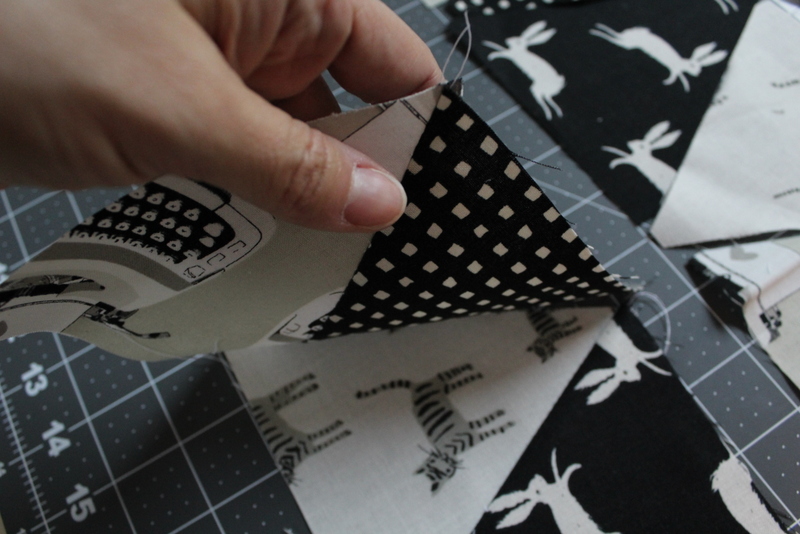
Make sure that you have cut all the points off the triangles like we talked about in the cutting post. You can see how mine look in the pictures below. Then pick the first triangle up and lay it on top of the second one as seen in the following series of pictures.


Sewing School - Triangle Quilt Block | Sewwhatalicia.com

Sewing School - Triangle Quilt Block | Sewwhatalicia.com

Sewing School - Triangle Quilt Block | Sewwhatalicia.com

Sewing School - Triangle Quilt Block | Sewwhatalicia.com

Sewing School - Triangle Quilt Block | Sewwhatalicia.com

Line up the edges very carefully and be very careful to use your 1/4″ seam allowance as you sew. Remember that seam ripper too! I am experienced and I have worked with these triangles several times (like in this cute blanket —>Triangle Quilt) and I still had to rip several of these apart and some of them more than once. It is ok it happens to all of us! Press the triangle open and then grab the next two. You will have a few sets of 2 and one left out. That is ok. Add the single to one of the sets and then attach the sets into one long strip. Making sure to line up carefully each time and press open.

Sewing School - Triangle Quilt Block | Sewwhatalicia.com

Sewing School - Triangle Quilt Block | Sewwhatalicia.com

Sewing School - Triangle Quilt Block | Sewwhatalicia.com

Sewing School - Triangle Quilt Block | Sewwhatalicia.com

You will end up with a long strip like this:

Sewing School - Triangle Quilt Block | Sewwhatalicia.com

Sew all three of the strips together in this manner.

Sewing School - Triangle Quilt Block | Sewwhatalicia.com

Then we are ready to put the three strips together.

Fold one strip over onto the next. Take special care that the points line up with each other. I like to place a pin on each point so that they stay exactly where I put them.

Sewing School - Triangle Quilt Block | Sewwhatalicia.com

Sewing School - Triangle Quilt Block | Sewwhatalicia.com

The last step is to trim the block up to make it square. There are two options here. This block squared up will be larger than 12″. I didn’t want to lose the proportions so I just trimmed it to where it was natural. Line up your ruler as pictured below.

Sewing School - Triangle Quilt Block | Sewwhatalicia.com

And go for the cut! Trim both sides.

Sewing School - Triangle Quilt Block | Sewwhatalicia.com

Now your block is all set!

Sewing School - Triangle Quilt Block | Sewwhatalicia.com Sewing School - Triangle Quilt Block | Sewwhatalicia.com

Like I said this block is a bit big but I went ahead and ironed it under to be 12″ so that if I decide to make a pillow or something out of it in the future I still have to whole block in tact.

Sewing School - Triangle Quilt Block | Sewwhatalicia.com

Alright now head over to the Facebook group and show me yours!! I can’t wait to see how everyone’s projects turn out! I am always open for your questions! If you are getting frustrated check in with me!

On to February and our next project! Next month we will work on some adorable coasters!


Related

Never miss a stitch!

Never miss a stitch!

Signup be notified every time I stitch up something new!

You have Successfully Subscribed!

  • Facebook
  • Twitter
alicia

About Alicia

Hi I am Alicia thanks for taking some time out of your day to be with me! I am crazy about sewing and blogging! I love creating tutorials and patterns and sharing ideas with people! Read more...

Heart Pillow Gift Card Holder
Applique Fox Diaper Clutch Tutorial

Leave a Reply Cancel reply

Your email address will not be published. Required fields are marked *

Rate This Project!


I love to sew and I am passionate about teaching you everything that I know! Thank you for joining me on this journey!
READ MORE >>

Follow Me!

Signup be notified every time I stitch up something new!

You have Successfully Subscribed!


  • Home
  • About Me!
  • All Things Sewing
  • Quilting
  • Cut Files
  • Christmas Sewing

© 2023 sewwhatalicia.com. All rights reserved. Privacy Policy

  • Facebook
  • Twitter
  • Pinterest