Sew What, Alicia?

Easy Fabric Projects for all Levels

  • Facebook
  • Instagram
  • Pinterest
  • Twitter
  • Home
  • About Me!
    • Signup!
  • All Things Sewing
  • Quilting
  • Cut Files
  • Christmas Sewing
Home » Embroidery » Patriotic Mason Jar Embroidery Tutorial
This post may contain affiliate links. I may receive a small commission from your purchase at no extra charge to you. See our full disclosures HERE.

June 16, 2017 by: sewwhatalicia

Patriotic Mason Jar Embroidery Tutorial

  • Facebook
  • Twitter

Patriotic Mason Jar Embroidery Tutorial

Hi, it’s Olivia from Pumpkin Hollow Quilting, bringing you some Independence Day cuteness!  If you’ve been following me over on Instagram, you might have seen I’ve caught the Patriotic making bug.  So I thought I’d share with you a quick little stitch I designed, celebrating the 4th of July. Here is a patriotic mason jar embroidery tutorial.


Patriotic Mason Jar Embroidery Tutorial: This patriotic embroidery tutorial is the perfect project for summer! This step by step tutorial is great for beginners and those who want an easy project. Click through for the full tutorial. | www.sewwhatalicia.com

Patriotic Mason Jar Embroidery Tutorial

Supplies:

Patriotic Mason Jar Embroidery Tutorial: This patriotic embroidery tutorial is the perfect project for summer! This step by step tutorial is great for beginners and those who want an easy project. Click through for the full tutorial. | www.sewwhatalicia.com* 10 inch square piece of background fabric

* 10 inch square piece of fusible interfacing (I used Pellon P44F)

​* Micron Pen 0.2

* 6 inch Embroidery Hoop

*Crayola Crayon in Sky Blue (or blue of your choice)

* Embroidery Scissors

* Size 9 Embroidery Needle

* 6 inch piece of felt

* Iron

* Paper towel

* Fabric Scissors

* Fabric Glue

* Patriotic Jar Pattern

DMC Floss needed for our project – Click the number to be taken to the color on amazon.

3811 – Jar

414 – Flag pole and Sparklers pole

321 – Flag stripes, Sparklers

311 – Flag outline around star, Sparklers

117 – Star

727 – French knot at the top of flagpole

Mason Jar Embroidery Tutorial Instructions:

First thing we need to do is trace our pattern onto the background fabric with the Micron Pen.  Print the pattern from the supply list above. Then tape the pattern and fabric to a window using painters tape. You can also use a light box if you have one.  

Patriotic Mason Jar Embroidery Tutorial: This patriotic embroidery tutorial is the perfect project for summer! This step by step tutorial is great for beginners and those who want an easy project. Click through for the full tutorial. | www.sewwhatalicia.com

Once your pattern is traced, its time to color tint our jar!  You take your crayon and start to lightly shade the jar, your hand pressure should be about medium/light.  I kinda color in a light swirl motion, while shading different areas a little darker than others.

Patriotic Mason Jar Embroidery Tutorial: This patriotic embroidery tutorial is the perfect project for summer! This step by step tutorial is great for beginners and those who want an easy project. Click through for the full tutorial. | www.sewwhatalicia.com

**Note – I recommend using only Crayola Crayons**

Now that your jar is color tinted, it’s time to heat set your stitchery.  With your iron set to the cotton setting, steam off, I place my paper towel over the stitchery.  Bring the iron straight down and leave in place for about 5 seconds. Bring the iron back up and repeat a few times without moving the paper towel.  Now your design is set!  

Patriotic Mason Jar Embroidery Tutorial: This patriotic embroidery tutorial is the perfect project for summer! This step by step tutorial is great for beginners and those who want an easy project. Click through for the full tutorial. | www.sewwhatalicia.com

Right before I get ready to stitch, I like to fuse a piece of fusible interfacing to the back of my stitchery.  This will help to keep our piece nice and straight as we stitch.

Patriotic Mason Jar Embroidery Tutorial: This patriotic embroidery tutorial is the perfect project for summer! This step by step tutorial is great for beginners and those who want an easy project. Click through for the full tutorial. | www.sewwhatalicia.com

Now that we have everything traced and tinted, let’s pop our stitchery into the hoop! It’s time to stitch!!

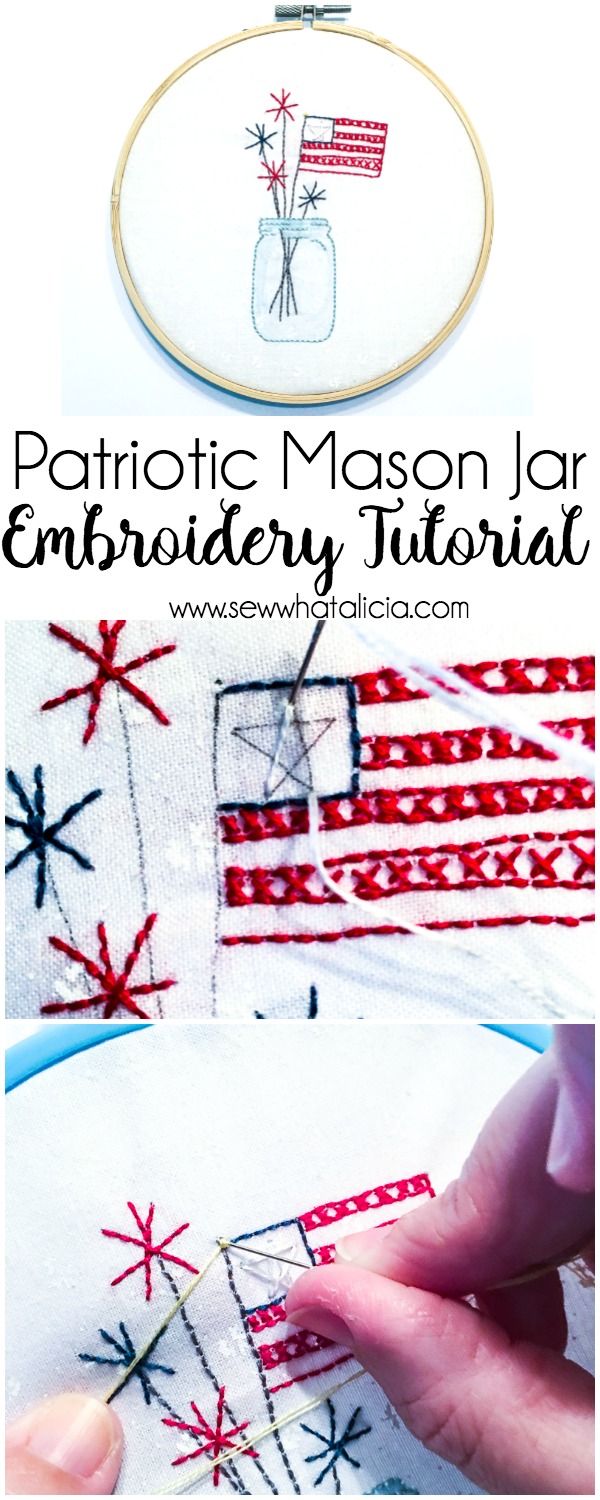
First up, we are going to start stitching up our cute little jar! For this project we will use 2 strands of floss throughout.  Just before you start the first stitch, be sure to knot the end of your thread. Now find a place where you’d like to start and bring your needle up from the back, pulling your thread until the knot catches.  Jog over not quite an 1/8th of an inch and bring your needle back down. Bring the needle back up (1/8th inch over) and this time we will bring the needle back down in the same hole at the end of your last stitch. You’ve now completed your first back stitch! Continue this same process until your jar is all stitched! Once you have finished with your piece of floss, be sure to knot it on the backside of your stitchery so your stitches don’t unravel.

Patriotic Mason Jar Embroidery Tutorial: This patriotic embroidery tutorial is the perfect project for summer! This step by step tutorial is great for beginners and those who want an easy project. Click through for the full tutorial. | www.sewwhatalicia.com

I stitched up two of the sparklers with blue and 3 sides of my star outline, using DMC 311.  

Patriotic Mason Jar Embroidery Tutorial: This patriotic embroidery tutorial is the perfect project for summer! This step by step tutorial is great for beginners and those who want an easy project. Click through for the full tutorial. | www.sewwhatalicia.com

Using DMC 321, I stitched the remaining Sparklers and started stitching my flag around 3 sides and each stripe.

Patriotic Mason Jar Embroidery Tutorial: This patriotic embroidery tutorial is the perfect project for summer! This step by step tutorial is great for beginners and those who want an easy project. Click through for the full tutorial. | www.sewwhatalicia.com

After I had my stripes stitched, I filled in every other bar with X’s to give it that red and white effect. To make your stitched X, you bring the needle up from the back and take it back down at an angle…think of when you write an X.  Then you bring your needle up from the back, cross it over your angled previous stitch and take the needle back down.  

Continue on until you’ve filled 4 of your bars.

Patriotic Mason Jar Embroidery Tutorial: This patriotic embroidery tutorial is the perfect project for summer! This step by step tutorial is great for beginners and those who want an easy project. Click through for the full tutorial. | www.sewwhatalicia.com

For our star, we are going make several large stitches…think big back stitches.   Take your white DMC floss and pick your starting point.  Bring the needle up from the back and take it back down on the other side of a star point, repeat until you have stitched the entire star. Pretty cool!  The flag is looking good.

Patriotic Mason Jar Embroidery Tutorial: This patriotic embroidery tutorial is the perfect project for summer! This step by step tutorial is great for beginners and those who want an easy project. Click through for the full tutorial. | www.sewwhatalicia.com

Patriotic Mason Jar Embroidery Tutorial: This patriotic embroidery tutorial is the perfect project for summer! This step by step tutorial is great for beginners and those who want an easy project. Click through for the full tutorial. | www.sewwhatalicia.com Patriotic Mason Jar Embroidery Tutorial: This patriotic embroidery tutorial is the perfect project for summer! This step by step tutorial is great for beginners and those who want an easy project. Click through for the full tutorial. | www.sewwhatalicia.com

Can’t forget about our flag and sparkler poles!  This is stitched using DMC 414.

Patriotic Mason Jar Embroidery Tutorial: This patriotic embroidery tutorial is the perfect project for summer! This step by step tutorial is great for beginners and those who want an easy project. Click through for the full tutorial. | www.sewwhatalicia.com

The final stitch we’ll do on our Patriotic Jar is one French Knot!  I made my French Knot using two strands of DMC 727. Make sure the end is knotted before you begin.  Bring your needle up from the back until the knot catches and with one hand hold your needle and the other hold your thread.

Patriotic Mason Jar Embroidery Tutorial: This patriotic embroidery tutorial is the perfect project for summer! This step by step tutorial is great for beginners and those who want an easy project. Click through for the full tutorial. | www.sewwhatalicia.com

Wrap your thread twice around the needle.

Patriotic Mason Jar Embroidery Tutorial: This patriotic embroidery tutorial is the perfect project for summer! This step by step tutorial is great for beginners and those who want an easy project. Click through for the full tutorial. | www.sewwhatalicia.com

Stick the tip of your needle into your background fabric and while still holding your thread, shift your two wraps down towards the hole.

Patriotic Mason Jar Embroidery Tutorial: This patriotic embroidery tutorial is the perfect project for summer! This step by step tutorial is great for beginners and those who want an easy project. Click through for the full tutorial. | www.sewwhatalicia.com

Then with your one had still holding the thread, push your needle through and grab it from the back.

Patriotic Mason Jar Embroidery Tutorial: This patriotic embroidery tutorial is the perfect project for summer! This step by step tutorial is great for beginners and those who want an easy project. Click through for the full tutorial. | www.sewwhatalicia.com

Pull your thread though to the back, all the while holding onto your thread until those last few seconds when you can let it go and your knot should appear!

Patriotic Mason Jar Embroidery Tutorial: This patriotic embroidery tutorial is the perfect project for summer! This step by step tutorial is great for beginners and those who want an easy project. Click through for the full tutorial. | www.sewwhatalicia.com

Now you have completed all your stitching! Yay!! It looks fantastic and very 4th of July festive!

Patriotic Mason Jar Embroidery Tutorial: This patriotic embroidery tutorial is the perfect project for summer! This step by step tutorial is great for beginners and those who want an easy project. Click through for the full tutorial. | www.sewwhatalicia.com

Go ahead and pop your stitched piece out of your embroidery hoop and give it a nice pressing with the iron.  Then grab your wooden hoop and center your design inside the hoop.  Once you are satisfied with its placement, tighten down your screw.  Now with your scissors, carefully cut your excess fabric from the back.  

Patriotic Mason Jar Embroidery Tutorial: This patriotic embroidery tutorial is the perfect project for summer! This step by step tutorial is great for beginners and those who want an easy project. Click through for the full tutorial. | www.sewwhatalicia.com

We have just one last step until our Patriotic Jar is finished!  Take that 6 inch piece of felt and cut it into a circle large enough to fit inside your hoop back, then glue in place!

Patriotic Mason Jar Embroidery Tutorial: This patriotic embroidery tutorial is the perfect project for summer! This step by step tutorial is great for beginners and those who want an easy project. Click through for the full tutorial. | www.sewwhatalicia.com

Now you’re all finished!  Hope you enjoyed stitching up my Patriotic Jar pattern as much as I enjoyed sharing it with you!

Patriotic Mason Jar Embroidery Tutorial: This patriotic embroidery tutorial is the perfect project for summer! This step by step tutorial is great for beginners and those who want an easy project. Click through for the full tutorial. | www.sewwhatalicia.com

Thanks so much to Olivia for this awesome mason jar embroidery tutorial! Make sure and check her out on Instagram, Facebook, and Etsy!

For more embroidery check out the Summer Watermelon Embroidery Tutorial, Easy Embroidery Flower Tutorial, and 20 Awesome Embroidery Patterns.

Related

Never miss a stitch!

Never miss a stitch!

Signup be notified every time I stitch up something new!

You have Successfully Subscribed!

  • Facebook
  • Twitter
alicia

About Alicia

Hi I am Alicia thanks for taking some time out of your day to be with me! I am crazy about sewing and blogging! I love creating tutorials and patterns and sharing ideas with people! Read more...

Patriotic Quote Cut File
Where to Find Cross Stitch Patterns – Plus 20 Patterns

Leave a Reply Cancel reply

Your email address will not be published. Required fields are marked *

Rate This Project!


Comments

  1. Michelle says

    June 26, 2022 at 5:01 am

    Sew Cute! Thanks for sharing it with us! I can’t wait to get started.

    Reply

I love to sew and I am passionate about teaching you everything that I know! Thank you for joining me on this journey!
READ MORE >>

Follow Me!

Signup be notified every time I stitch up something new!

You have Successfully Subscribed!


  • Home
  • About Me!
  • All Things Sewing
  • Quilting
  • Cut Files
  • Christmas Sewing

© 2023 sewwhatalicia.com. All rights reserved. Privacy Policy

  • Facebook
  • Twitter
  • Pinterest