What is a Serger?
Gina here with you today to explain what a serger is and help take the fear out of sewing with one! The day I got my serger I remember being filled with excitement until I actually got it home! I was so ready to be able to finish seams off in a more professional, finished and secure way but man all the settings looked overwhelming. I will just be honest and say, I let it sit there for almost a month before I decided to get over the intimidation and fear and just go for it. If I have one piece of advice for you it would be JUST START! Make sure and scroll to the bottom for a video walkthrough!
What is a Serger, and How Do I Use It?
What is a Serger?
A serger is a sewing machine that binds fabric together with an overlock stitch. It uses 3-4 stitches to create the overlock stitch. This is the finishing stitch you see on many of your shirts and garments that you have around the house right now.
I use the Brother 1034D.
If you want a more detailed in depth dive into this machine check out THIS COURSE from Emily at Life Sew Savory. She is so knowledgeable with her serger and she will teach you even more!!!
If you aren’t sure what the difference between a serger and a sewing machine is then THIS is a good place to start.
Learning Your Settings
First, let’s talk about the settings. There are 2 areas where you will find these on your serger. The dials you see on top of the machine are the tension settings for your thread. From left to right, they are:
- left needle
- right needle
- upper looper
- lower looper
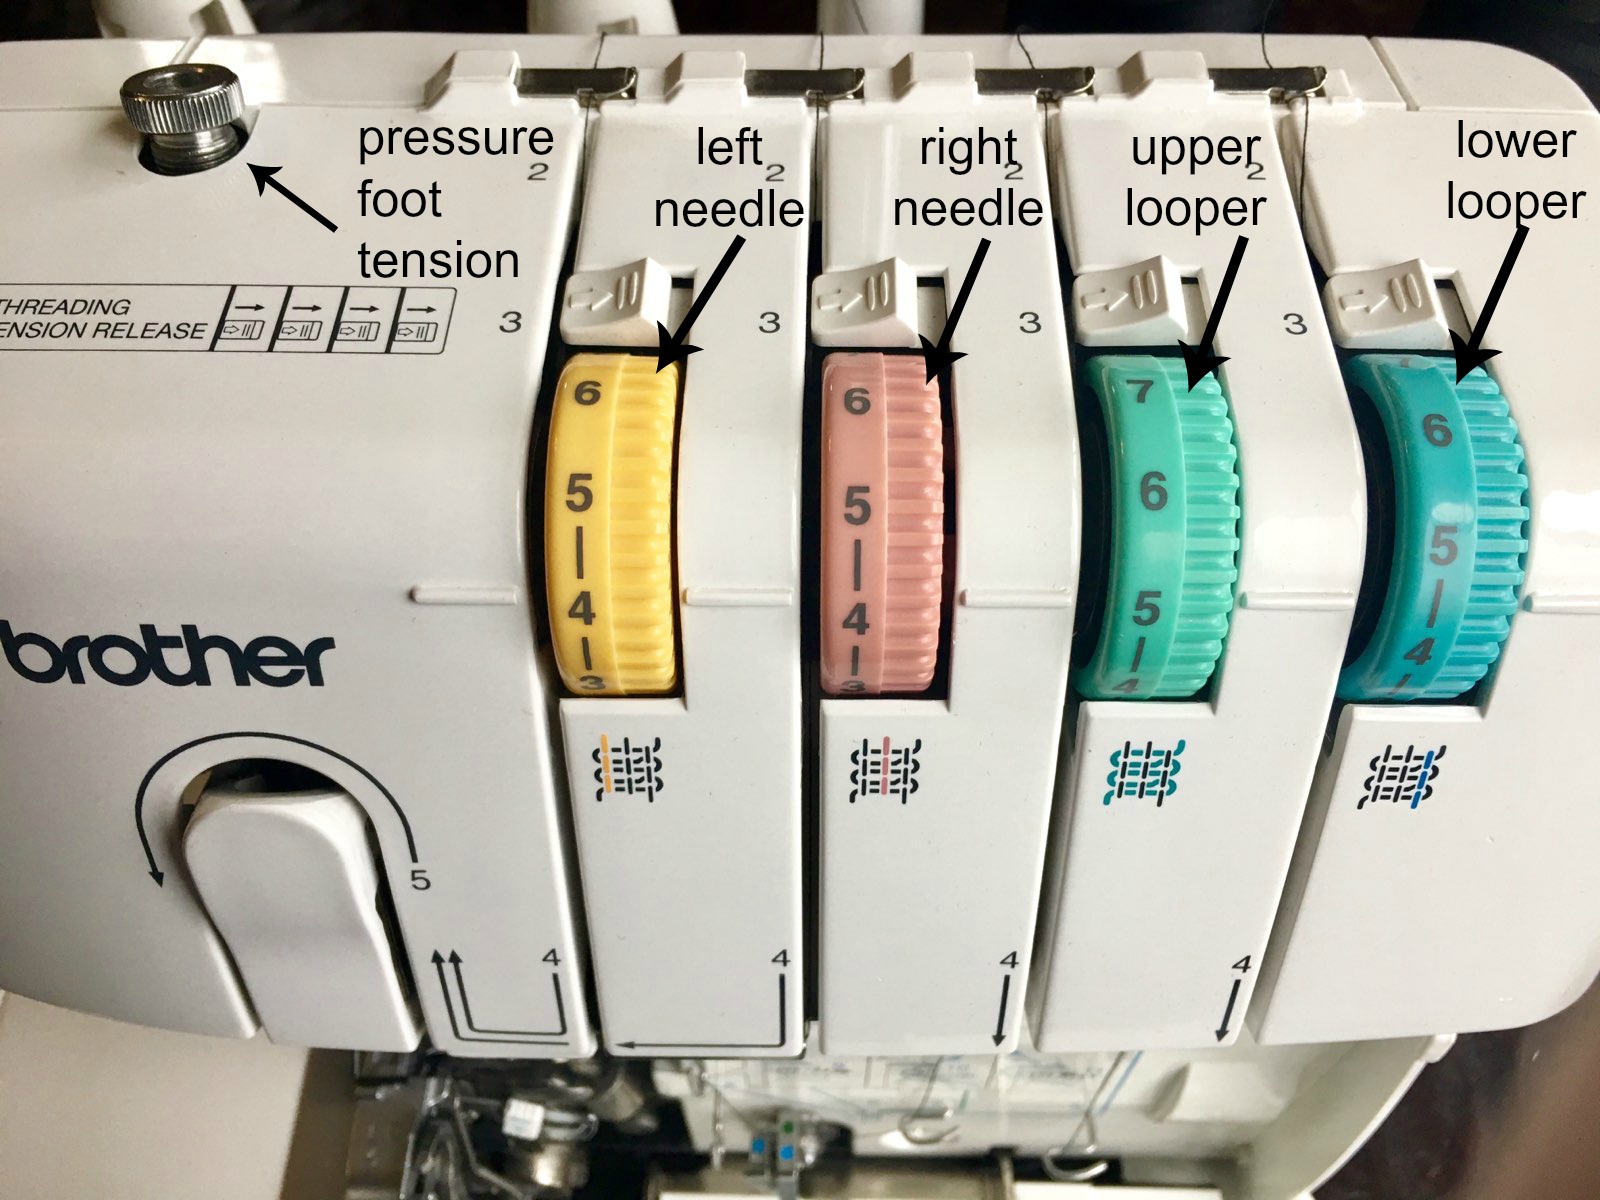
The needle settings are for each needle while the looper settings are for the thread that goes around the edge of the fabric and loop the stitches together. For my machine, the standard for each of these tension settings is 4. Every machine has it’s own standard settings so be sure to check your manual if you have a different brand! Depending on the fabric you are using, you may need to increase or decrease these slightly which I had to do with the last project I sewed.
The little knob on the top is your pressure foot tension. If you are sewing very thin fabric, you will want to have more pressure than if you were sewing something really thick. To adjust this you simply turn it clockwise for more pressure (lightweight fabrics) or counterclockwise for less pressure (for heavyweight fabrics).
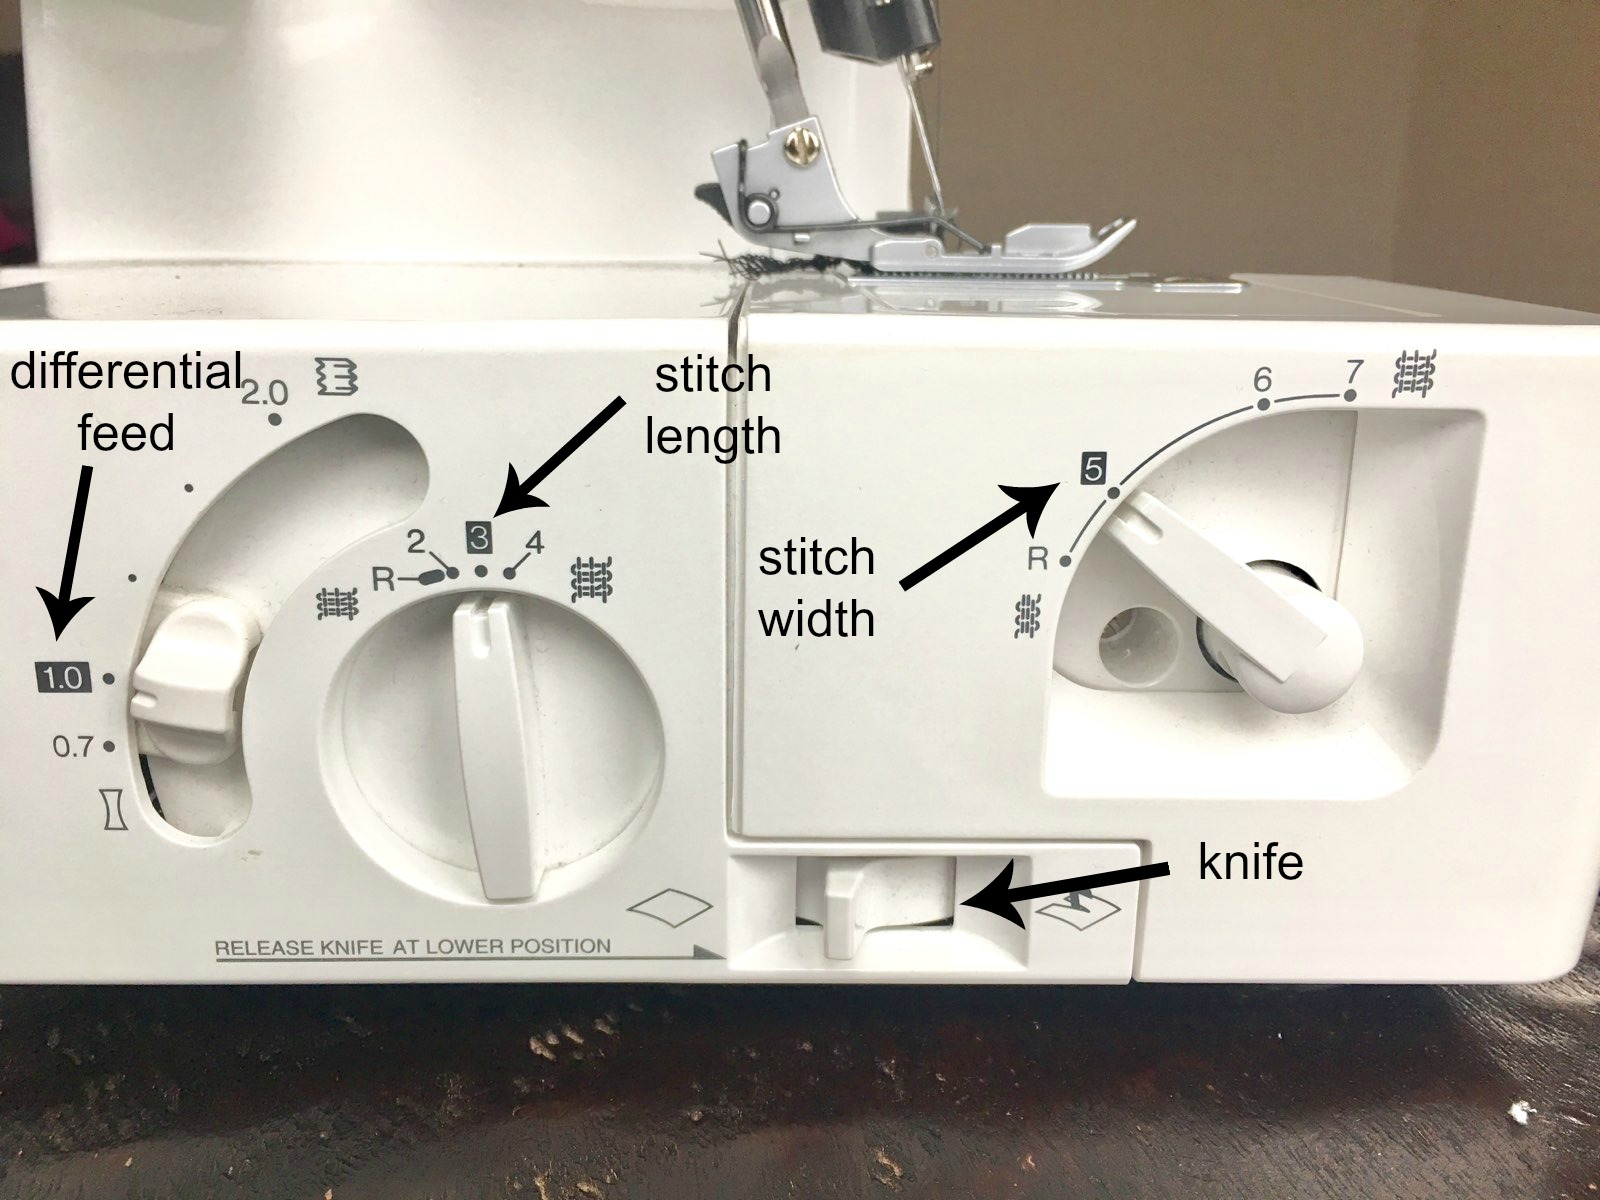
The other settings are along the left of the machine. These will adjust the stitch width and length, turn the knife on or off and adjust whether the feed dogs move together or not. The stitch width and length are pretty self-explanatory. There are times when you may want to turn your knife off, like if you are stitching towards a corner. This will keep you from cutting into your fabric where you don’t want. The differential feed allows you to gather your fabric if you would like, which is kind of a neat feature! (It is a bit more complex than simply changing one setting, so we won’t go into that today.) Did you happen to notice the grey box around the numbers? This is to let you know what the standard settings are. Makes it pretty easy to remember them, right?!
Threading Your Serger
The next step is to get comfortable with threading your machine. It can seem intimidating at first but there are color-coded pictures to remind you which thread goes where.

Some people recommend adding numbers to your serger so you remember what order to thread the machine in, which is upper looper, lower looper, right needle, left needle. My machine came with long tweezers which have become a necessary tool in my option! You will need to grab the thread from some odd angles that only those tweezers can get to. One word of advice for threading your machine: if your thread stops chaining off or it isn’t stitching right, re-thread it COMPLETELY! Don’t try to cut corners and re-thread only one of them because chances are it won’t work and you will have a bigger mess and more frustration. Get comfortable threading that baby and you won’t have to worry when your needle breaks!
Chaining Off
One last thing to go over is chaining off. When sewing on your regular machine you never want to keep sewing once you get the end of your fabric as this would cause a big problem. This is different with the serger! You want to continue sewing until you have a chain of stitches off the end of your fabric. You always start and end with a chain like the one below.
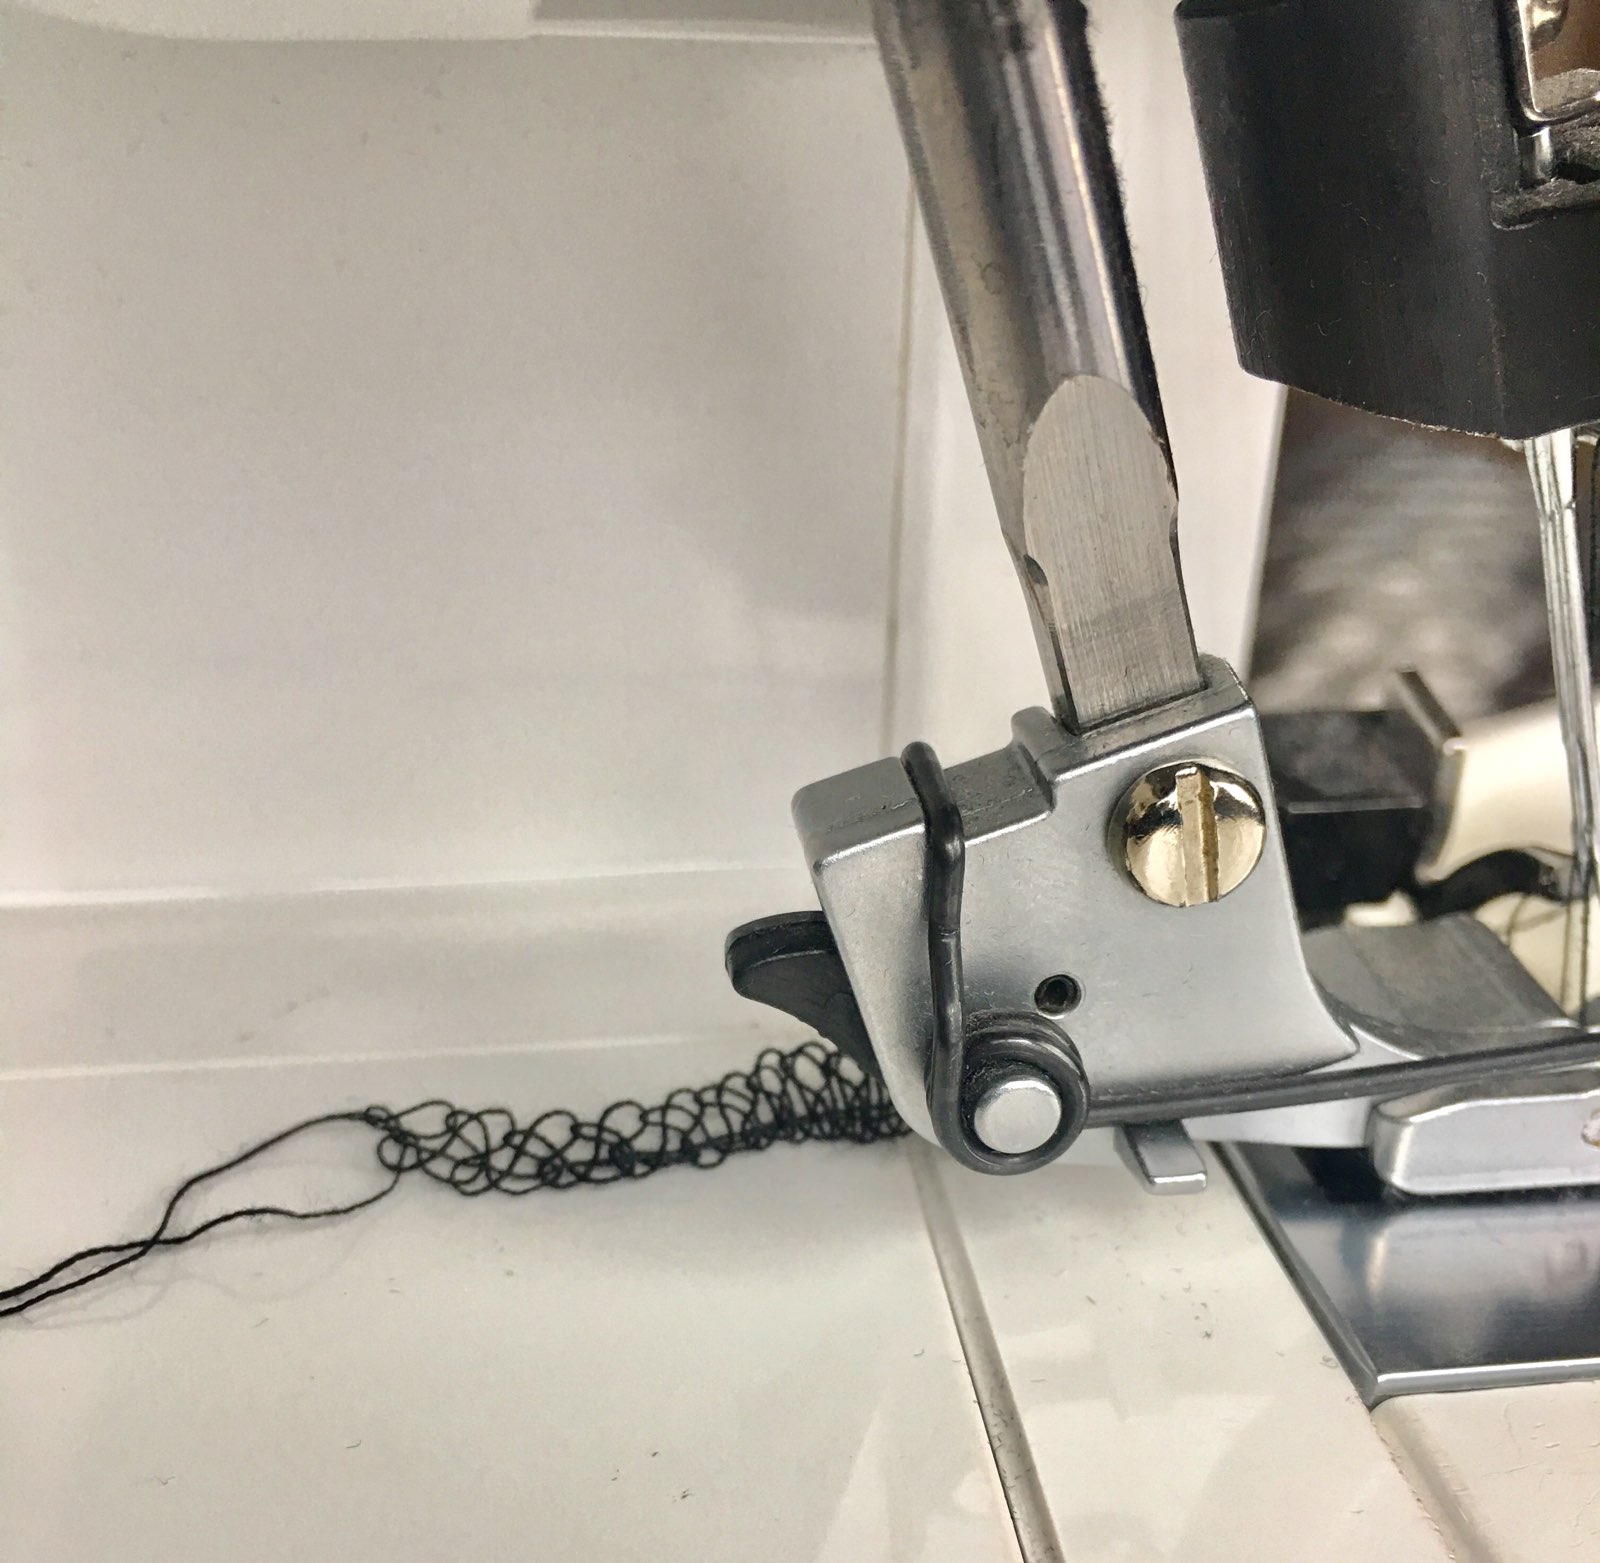
These chains do need to be secured in some way so the stitches do not come unraveled. One option is to thread them into an upholstery needle and tuck the tail back into your stitches. Another is to stitch to the end of the fabric, lift your presser foot, flip the fabric around and sew back over your stitches a couple of inches before guiding your stitches back off the fabric and making a 2-3 inch chain. Don’t worry, I will demonstrate all of this in the live video on Monday!
Thanks for joining me, I hope this has helped build some confidence that you can in fact master this machine! Here’s to overcoming the intimidation and sewing with your serger like a boss!


Julie says
I like the tutorial, but was confused by what seems like contradicting statements.
The little knob on the top is your pressure foot tension. If you are sewing very thin fabric, you will want to have less pressure than if you were sewing something really thick. To adjust this you simply turn it clockwise for more pressure (lightweight fabrics) or counterclockwise for less pressure (for heavyweight fabrics).
First you say thing fabric needs less pressure (which sounded counterintuitive), then when you explain how to adjust it, you indicate clockwise for more pressure and for lightweight fabric and counterclockwise for less and heavyweight fabrics.
Can you clarify which it is? I’m sure it’s a typo, but would like to know before I start playing with my hand-me-down machine.
Thanks!
Gina Peak says
You’re so right Julie! That was a typo! You will want more pressure with thin fabrics. I have updated the post so it’s correct now.
Holly says
HI Alicia, I am new to sewing and was hoping to learn embroidery with a computerized machine. I’d like to do some fun things for my fur babies like collars and beds. Can you recommend an entry level machine (cost is a HUGE factor) that is “heavy duty” enough for those types of projects? Thank you!
Linda Lubbesmeyer says
I just found this…shoulda been looking before now. LOL I’ve had my Brother 1034D for over two years and have used it maybe twice, coward that I am. I was just thinking today about a big project I have to do and wondering if it could be done on the serger (three thick layers of different types of fabric), and started searching Pinterest. And there you were. I’m saving this so I can find it again, and will no doubt use the link you left for Life Sew Savory too. Thanks so much for sharing!