Sew What, Alicia?

Easy Fabric Projects for all Levels

  • Facebook
  • Instagram
  • Pinterest
  • Twitter
  • Home
  • About Me!
    • Signup!
  • All Things Sewing
  • Quilting
  • Cut Files
  • Christmas Sewing
Home » Free Patterns » How to Sew Adorable Felt Food
This post may contain affiliate links. I may receive a small commission from your purchase at no extra charge to you. See our full disclosures HERE.

February 8, 2017 by: sewwhatalicia

How to Sew Adorable Felt Food

  • Facebook
  • Twitter

How to Sew Adorable Felt Food

I couldn’t be more excited to have a guest post today from an amazing designer and “sewist.” Emily is seriously talented and I am so happy that she has agreed to share her talent with us!! Here is a tutorial for how to sew adorable felt food!

How to Sew Adorable Felt Food: This tutorial is perfect for learning to sew felt food for your little ones! The felt food also makes a great gift! Click through for the full tutorial including making adorable freezer paper food labels! | www.sewwhatalicia.com

How to Sew Adorable Felt Food

What you’ll need:

For the printed labels:

–Freezer Paper

– Iron

– Pencil

– Lightweight fabric (I like to use a basic cotton)

– piece of standard printer paper (8.5”x11”)

– Scissors

– Printed Food Label

– Fray Check (my best friend)

For felt hummus:

For this simplicity, I’m just using  9”x12” standard craft felt sheets you can find at any craft store.

–Tan felt x2

–Green felt  x1

-Needle and Thread

– Sewing Machine (I mean, I guess this is optional, if you’re a brave soul or find hand sewing therapeutic… which if you do, teach me your ways)

–Polyfil stuffing

–Hummus Pattern Template

Instructions:

Freezer Paper Labels:

Gather your goods

How to Sew Adorable Felt Food: This tutorial is perfect for learning to sew felt food for your little ones! The felt food also makes a great gift! Click through for the full tutorial including making adorable freezer paper food labels! | www.sewwhatalicia.com

Spread out your white cotton fabric and lay the freezer paper down on top of it with the shiny side facing the fabric. (I would recommend ironing your fabric before hand to make sure all the wrinkles are out or it won’t adhere flat to the paper.)

On top of the matte side, of your freezer paper, start ironing. You will start to see the paper pucker a bit, but that is normal and means you’re doing it correctly. This may take a few passes over the area, you want to adhere, to make sure it doesn’t pull apart going through the printer.

How to Sew Adorable Felt Food: This tutorial is perfect for learning to sew felt food for your little ones! The felt food also makes a great gift! Click through for the full tutorial including making adorable freezer paper food labels! | www.sewwhatalicia.com

Once you have the freezer paper adhered to your fabric, lay down your piece of printer paper and trace along the edges.

How to Sew Adorable Felt Food: This tutorial is perfect for learning to sew felt food for your little ones! The felt food also makes a great gift! Click through for the full tutorial including making adorable freezer paper food labels! | www.sewwhatalicia.com

Cut the freezer paper/fabric sheet(s) out. Sometimes, I find, I have to go around the edges with the iron once more to make sure they didn’t separate when I was cutting. But, in the end you should have one fabric side and the other the matte side of the freezer paper.

How to Sew Adorable Felt Food: This tutorial is perfect for learning to sew felt food for your little ones! The felt food also makes a great gift! Click through for the full tutorial including making adorable freezer paper food labels! | www.sewwhatalicia.com

Good so far? Ok, good. Time to move on to the printer. First, take out all the paper in your printer so it’s just one sheet of your freezer paper/fabric. With the fabric facing whatever side your printer prints on, hit print on the labels PDF, and let it do it’s thing on the fabric.  (Another recommendation, I usually like to hold my sheets lightly until I know they are feeding into the printer straight)

How to Sew Adorable Felt Food: This tutorial is perfect for learning to sew felt food for your little ones! The felt food also makes a great gift! Click through for the full tutorial including making adorable freezer paper food labels! | www.sewwhatalicia.com

Once you have your sheets printed and you’re still basking in what a cool little trick that is and how much you saved on screen-printing… cut your labels out WITHOUT peeling the freezer paper backing off yet. Patience.

How to Sew Adorable Felt Food: This tutorial is perfect for learning to sew felt food for your little ones! The felt food also makes a great gift! Click through for the full tutorial including making adorable freezer paper food labels! | www.sewwhatalicia.com


Say hello to my bestie, fray check. With the backing still attached, use this handy little liquid around the edges of your label and set aside to dry while you cut your felt pieces.

Using the provided Hummus Pattern Template, double up your TAN sheets of felt and cut a 6” circle (this will be your top and bottom) and then cut your two strips of 1” tan from the side of the sheet (these will be sewn together and create the sides of your hummus container)

Now setting aside your felt, go back to your dry label and slowly start to peel the fabric from the freezer paper backing. (If you don’t fray check to seal your fabrics raw edges you will have it pulling apart on you as it sticks to the backing.)

How to Sew Adorable Felt Food: This tutorial is perfect for learning to sew felt food for your little ones! The felt food also makes a great gift! Click through for the full tutorial including making adorable freezer paper food labels! | www.sewwhatalicia.com

Once it’s free of its freezer paper backing, pin the label to one of your tan 6” circles and sew around the edges.

How to Sew Adorable Felt Food: This tutorial is perfect for learning to sew felt food for your little ones! The felt food also makes a great gift! Click through for the full tutorial including making adorable freezer paper food labels! | www.sewwhatalicia.com

How to Sew Adorable Felt Food: This tutorial is perfect for learning to sew felt food for your little ones! The felt food also makes a great gift! Click through for the full tutorial including making adorable freezer paper food labels! | www.sewwhatalicia.com

Looking pretty good eh… set the top aside for now and pick your two green 1” strips. Line the edges up and sew together. (I like to iron down my seams when using the eco-fi craft felt, but some polyester felts will melt to your iron to proceed with caution.) Repeat the same step with your tan 1” felt strips.

How to Sew Adorable Felt Food: This tutorial is perfect for learning to sew felt food for your little ones! The felt food also makes a great gift! Click through for the full tutorial including making adorable freezer paper food labels! | www.sewwhatalicia.com

How to Sew Adorable Felt Food: This tutorial is perfect for learning to sew felt food for your little ones! The felt food also makes a great gift! Click through for the full tutorial including making adorable freezer paper food labels! | www.sewwhatalicia.com

Folding your, recently joined, green strip in half, iron it flat. (I like to pin it as well just incase there’s a felt rebellion and it fights me… take that, you rebel scum.)

How to Sew Adorable Felt Food: This tutorial is perfect for learning to sew felt food for your little ones! The felt food also makes a great gift! Click through for the full tutorial including making adorable freezer paper food labels! | www.sewwhatalicia.com How to Sew Adorable Felt Food: This tutorial is perfect for learning to sew felt food for your little ones! The felt food also makes a great gift! Click through for the full tutorial including making adorable freezer paper food labels! | www.sewwhatalicia.com

Taking your top circle, line up and pin you green felt strip around the edge leaving about 1/4th of and inch peeking around the circle. Trim the extra green strip.

How to Sew Adorable Felt Food: This tutorial is perfect for learning to sew felt food for your little ones! The felt food also makes a great gift! Click through for the full tutorial including making adorable freezer paper food labels! | www.sewwhatalicia.com

Ok bear with me here… taking your tan 1” strip, line it up with the edge of your top 6” circle, sandwiching the green folded strip between both, and pin.

How to Sew Adorable Felt Food: This tutorial is perfect for learning to sew felt food for your little ones! The felt food also makes a great gift! Click through for the full tutorial including making adorable freezer paper food labels! | www.sewwhatalicia.com

With your three layers (the top circle, green folded strip, and tan strip) pinned and ready to go, make sure your edges are lined up and sew around the outside.

How to Sew Adorable Felt Food: This tutorial is perfect for learning to sew felt food for your little ones! The felt food also makes a great gift! Click through for the full tutorial including making adorable freezer paper food labels! | www.sewwhatalicia.com

Once you unpin, it should look a little something like this.

How to Sew Adorable Felt Food: This tutorial is perfect for learning to sew felt food for your little ones! The felt food also makes a great gift! Click through for the full tutorial including making adorable freezer paper food labels! | www.sewwhatalicia.com

How to Sew Adorable Felt Food: This tutorial is perfect for learning to sew felt food for your little ones! The felt food also makes a great gift! Click through for the full tutorial including making adorable freezer paper food labels! | www.sewwhatalicia.com

Line up the edge of your tan strip with the remaining strip, trim the excess, and quick stitch it to seal up your circle.

How to Sew Adorable Felt Food: This tutorial is perfect for learning to sew felt food for your little ones! The felt food also makes a great gift! Click through for the full tutorial including making adorable freezer paper food labels! | www.sewwhatalicia.com

How to Sew Adorable Felt Food: This tutorial is perfect for learning to sew felt food for your little ones! The felt food also makes a great gift! Click through for the full tutorial including making adorable freezer paper food labels! | www.sewwhatalicia.com

Congratulations, you’re SO done with the hard part… now lets put that bottom piece on. Lining up your bottom 6” circle piece with the edge of your tan strip, pin together, and sew around the edges same as with the top circle. Make sure to leave around a 1”- 1.5” hole open so you can stuff your soon-to-be completed hummus container.

How to Sew Adorable Felt Food: This tutorial is perfect for learning to sew felt food for your little ones! The felt food also makes a great gift! Click through for the full tutorial including making adorable freezer paper food labels! | www.sewwhatalicia.com

How to Sew Adorable Felt Food: This tutorial is perfect for learning to sew felt food for your little ones! The felt food also makes a great gift! Click through for the full tutorial including making adorable freezer paper food labels! | www.sewwhatalicia.com

How to Sew Adorable Felt Food: This tutorial is perfect for learning to sew felt food for your little ones! The felt food also makes a great gift! Click through for the full tutorial including making adorable freezer paper food labels! | www.sewwhatalicia.com

Once you have sewn the bottom 6” circle  (while leaving that stuffing opening we just talked about) it should look something like this…

How to Sew Adorable Felt Food: This tutorial is perfect for learning to sew felt food for your little ones! The felt food also makes a great gift! Click through for the full tutorial including making adorable freezer paper food labels! | www.sewwhatalicia.com

How to Sew Adorable Felt Food: This tutorial is perfect for learning to sew felt food for your little ones! The felt food also makes a great gift! Click through for the full tutorial including making adorable freezer paper food labels! | www.sewwhatalicia.com

How to Sew Adorable Felt Food: This tutorial is perfect for learning to sew felt food for your little ones! The felt food also makes a great gift! Click through for the full tutorial including making adorable freezer paper food labels! | www.sewwhatalicia.com

There’s almost nothing as depressing as an empty hummus container… so let’s fix that! Taking your polyfil, stuff the hummus shell until it’s to your desired firmness. (I usually like to use quite a bit of stuffing. It’s a bit firmer that way, gives it some durability, and if there’s no seating available makes an adequate cushion on hard playroom floors… not that I’ve ever done that as a mother.)

All that’s left is to sew up your stuffing opening. I usually like to hand stitch this.

How to Sew Adorable Felt Food: This tutorial is perfect for learning to sew felt food for your little ones! The felt food also makes a great gift! Click through for the full tutorial including making adorable freezer paper food labels! | www.sewwhatalicia.com

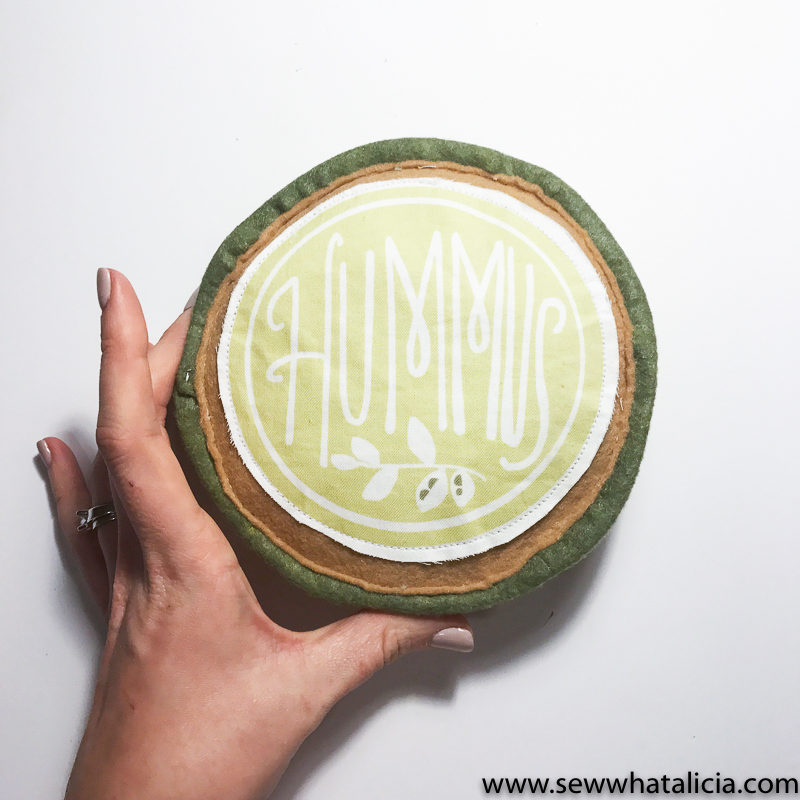
Ta-Da! You have a felt hummus container all ready to be added to the refined play food palette of your favorite toddler.

Enjoy!

How to Sew Adorable Felt Food: This tutorial is perfect for learning to sew felt food for your little ones! The felt food also makes a great gift! Click through for the full tutorial including making adorable freezer paper food labels! | www.sewwhatalicia.com

How to Sew Adorable Felt Food: This tutorial is perfect for learning to sew felt food for your little ones! The felt food also makes a great gift! Click through for the full tutorial including making adorable freezer paper food labels! | www.sewwhatalicia.com

How to Sew Adorable Felt Food: This tutorial is perfect for learning to sew felt food for your little ones! The felt food also makes a great gift! Click through for the full tutorial including making adorable freezer paper food labels! | www.sewwhatalicia.com

Can we all give Emily a huge shout out for this awesome how to sew adorable felt food tutorial?!?! Go ahead down there in the comments, give her some love!

Meet Emily:

Emily is a wonderful designer and “sewist.” She is a fellow military spouse who I have been stalking online for months (only kind of kidding) to get to share her amazing skill with us!! Once we finally connected I discovered that we live just a few towns away!! I hope to convince her to come teach me more of her awesome skills soon!! Make sure and follow her on Instagram —> @tinynaturalist


Related

Never miss a stitch!

Never miss a stitch!

Signup be notified every time I stitch up something new!

You have Successfully Subscribed!

  • Facebook
  • Twitter
alicia

About Alicia

Hi I am Alicia thanks for taking some time out of your day to be with me! I am crazy about sewing and blogging! I love creating tutorials and patterns and sharing ideas with people! Read more...

20+ Adorable Hand Embroidery Patterns
Heat Transfer Vinyl Batman Shirt Tutorial

Leave a Reply Cancel reply

Your email address will not be published. Required fields are marked *

Rate This Project!


I love to sew and I am passionate about teaching you everything that I know! Thank you for joining me on this journey!
READ MORE >>

Follow Me!

Signup be notified every time I stitch up something new!

You have Successfully Subscribed!


  • Home
  • About Me!
  • All Things Sewing
  • Quilting
  • Cut Files
  • Christmas Sewing

© 2023 sewwhatalicia.com. All rights reserved. Privacy Policy

  • Facebook
  • Twitter
  • Pinterest